

Managing tax settings in WooCommerce is crucial for accurately calculating and applying taxes to the products sold on your online store. WooCommerce provides flexible options to handle different tax scenarios based on your location and the locations of your customers. In this guide, we will walk you through the process of managing WooCommerce tax settings to ensure compliance with tax regulations and a seamless shopping experience for your customers.
Read: WooCommerce Database Optimization Best Practices
Step-by-Step Guide to Managing WooCommerce Tax Settings
Follow these steps to configure tax settings in your WooCommerce store:
Step 1: Set the Default Tax Location
The first step is to set the default tax location for your store. To do this:
- Log in to your WordPress admin dashboard. Navigate to “WooCommerce” > “Settings.”
- Click on the “General” tab. Under the “Default customer location” section, choose the appropriate location for your store.
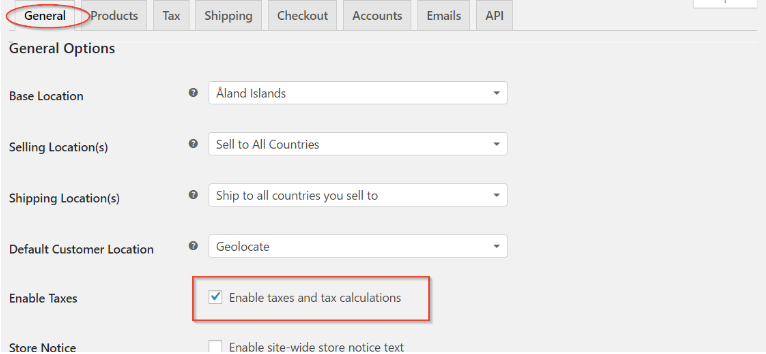
Step 2: Enable Taxes and Tax Calculations
Next, ensure that taxes are enabled in your WooCommerce settings:
- Still in the “General” tab, scroll down to the “Tax Options” section. Check the box next to “Enable taxes.”
- Choose whether you want to calculate taxes based on the “Customer shipping address” or “Customer billing address.”
Step 3: Define Tax Classes
Tax classes allow you to group products with similar tax rates. By default, WooCommerce provides standard tax classes like “Standard,” “Reduced Rate,” and “Zero Rate.” You can also create custom tax classes for specific products.
To set up tax classes:
- Go to “WooCommerce” > “Settings.” Click on the “Tax” tab.
- Under the “Standard Rates” or “Reduced Rate,” you can assign tax classes and tax rates for different regions.
Step 4: Add Tax Rates
Now, you need to define tax rates for each tax class based on your store’s location and tax regulations. To add tax rates:
- In the “Tax” tab, scroll down to the “Tax Rates” section. Click “Add Tax Rate.”
- Select the “Country” and “State” where the tax rate applies. Enter the “Rate %” for the tax class.
Step 5: Configure Display Options
Configure how taxes are displayed to customers during the checkout process:
- Still in the “Tax” tab, under the “Display Prices in the Shop” section, choose whether to display prices inclusive or exclusive of taxes.
- Choose how you want to display tax totals in cart and checkout pages.
Step 6: Test Tax Calculations
After configuring tax settings, it’s essential to test tax calculations to ensure accuracy. Add products to the cart with different tax classes and shipping addresses to verify that taxes are calculated correctly based on your settings.
Step 7: Handle Tax Exemptions
Some customers or products may be exempt from taxes due to specific regulations or reasons. WooCommerce allows you to handle tax exemptions for certain customers or product categories. You can set tax exemptions based on customer roles or individual customer profiles.
Step 8: Keep Up with Tax Regulations
Tax regulations can change over time, so it’s crucial to stay informed about any updates or changes to tax laws in your region. Regularly review tax rates and settings to ensure ongoing compliance with the latest regulations.
Read: A Guide To Setting Up WooCommerce Webhooks
In Conclusion
Managing tax settings in WooCommerce is a critical aspect of running a successful online store. By accurately configuring tax classes, tax rates, and display options, you can ensure compliance with tax regulations and provide a seamless shopping experience for your customers.
Follow this comprehensive guide to configure tax settings in your WooCommerce store effectively. Remember to test tax calculations and stay up to date with tax regulations to ensure ongoing compliance.
Accurate tax management not only helps you meet legal requirements but also contributes to positive customer experiences, leading to improved search engine rankings on Google and increased customer satisfaction.